One of the most common tasks a web developer deals with is to add event listeners to the elements of a page. Event listeners are employed to perform one or more actions when a given event occurs on one or more elements.
For example, by using an event listener we could display a dialog when a button is clicked by a user. In this case, the developer is running a single action (showing the dialog) when a click event occurs on one element (the button). Another example is a pagination widget. The latter is made of many links that lead the user to a given page when clicked. Here, the action is performed on many elements. The final example I want to mention is to use an event listener with elements that don’t yet exist in the page but will. This happens when injecting elements in the web page after the page is fully loaded, for example after an Ajax request is performed.
In this article, I’ll discuss how you, as a web developer, can optimize the addition of event listeners in all these situations by employing a technique called event delegation.
What problems event delegation solve?
Before we delve into what event delegation is, it’s important to understand why we might need it in first place.
Imagine that we’re creating a website with a search box. The results of a search are displayed in different chunks (pages) and the user should be able to navigate them. For this reason, we could create a pagination widget (or component). To avoid a full reload of the web page when a user selects another page from the widget, for example the second or the third, we want to employ Ajax to fetch the new results. Then, we’ll show them. We also want to follow the principles of progressive enhancement. By doing so, we ensure that a user will still be able to navigate the results if JavaScript is disabled or fails for any reason, and enhance the user experience if the JavaScript code is correctly loaded and executed. To avoid cluttering the interface, the pagination widget will always show up to five pages, even if there are more available.
The HTML code of the pagination widget could be as follows:
<ol class="pagination">
   <li class="active">
      <a href="page/1">1</a>
   </li>
   <li>
      <a href="page/2">2</a>
   </li>
   <li>
      <a href="page/3">3</a>
   </li>
   <li>
      <a href="page/4">4</a>
   </li>
   <li>
      <a href="page/5">5</a>
   </li>
</ol>
As you can see from the above code, the widget is made of an ordered list containing five links. Each of these links leads to a different results page. The class names used have no special meaning. They are there so that I can used later on to retrieve the elements.
To avoid a full reload of the web page, when a results page is selected, we need to add an event listener for the click event on all the anchor elements (a) of the widget. Inside the listener we have to prevent the default action.
The default action the browser performs when an a element is clicked is to load the resource found at the URL specified, causing a full reload of the page.
Once we’ve stopped the default action, we have to send the Ajax request to the URL specified by the anchor to fetch more results. Then, we need to display the new results. In addition, as the user navigates through the pages, we want to check if there are more page results available. If this is the case, we have to update the pagination widget accordingly so that the user can navigate more than just the initial five pages. Finally, we want to keep the maximum number of links displayed to five. This means that at every update some anchors will be added to the widget and some will be removed.
A possible implementation, which omits most of the code to focus on the matter at hand (event delegation), is shown below:
function onClick(event) {
   // Prevent the default action
   event.preventDefault();

   // Store the link of the clicked anchor
   const url = event.target.href;

   // Update the results by sending an Ajax request
   // to the URL specified in the "url" variable

   // Update the anchors in the pagination widget
   // and remove the event listener on the deleted anchors

   console.log('Fetching results at ' + url);
}

const anchors = document.querySelectorAll('.pagination a');

for (let i = 0; i < anchors.length; i++) {
   anchors[i].addEventListener('click', onClick);
}
The approach shown in the code above, also available on JSBin, has a few problems.
The first problem is that the code only adds the event listener on anchors that are already in the page. It doesn’t take into account those that don’t exist yet but will because of the updates to the pagination widget. The consequence is that if the user clicks on any of the new added anchors, a full reload of the page will occur. To solve this problem, we could add the event listener right after a new anchor is created. But this solution introduces a new issue, explained below.
JavaScript is a single-threaded language, thus it can’t execute more than one operation at a time. This means that while some code is executed no other operations can be performed. Any new operation is placed into a queue, including those performed because of the interaction of the user with the page. So, to improve the performance of the web page, we should avoid running an operation every time the widget is updated.
Another problem is that the proposed approach wastes a lot of memory. It adds an event listener to every a element added to the widget, even if the operation to execute is the same.
The solution to all these problems is to employ event delegation.
What is event delegation?
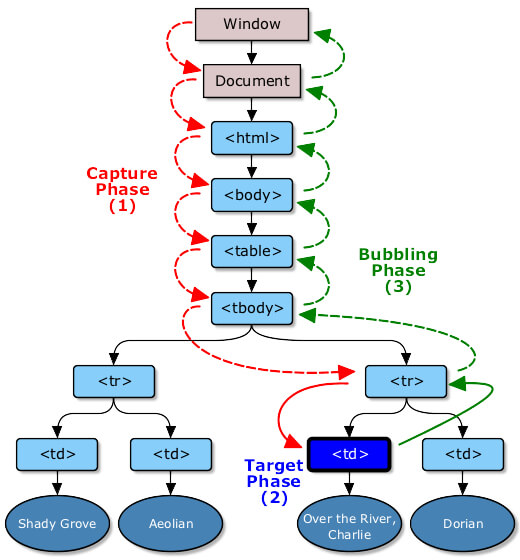
Event delegation is a technique that consists of adding an event listener to an ancestor of the element(s) on which the event of interest will be fired, instead of the element(s) itself. In the previous example, we would add an event listener to an ancestor of the anchor elements, for example the list itself.
Event delegation takes advantage of the propagation of events in the DOM. In most cases, the event listener is executed during the bubble phase, but we can execute a listener during the capturing phase as well.
If you want to know more about the event dispatch mechanism of the event model, you can read the section Event dispatch and DOM event flow of the W3C UI Events Specification.
Now that you know what event delegation is, let’s modify the previous example to see this technique in action.
Event delegation in action
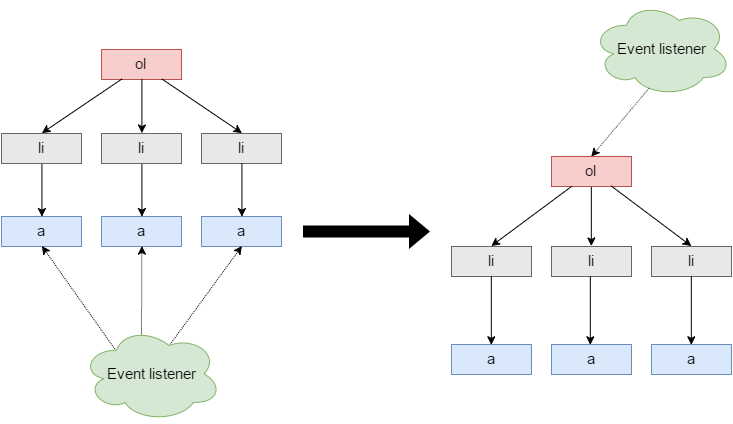
Before we start updating the code of our example, we have to find an element that is ancestor of all the elements we are interested in (the anchors). As mentined before, all the anchors are contained in the ordered list, so the latter is a good candidate. Now that we have found the right element, the first change is to add the event listener on the ordered list instead of all the anchors.
An event listener added to an element instead of its descendants to employ event delegation is called delegated event listener or delegated listener.
The second change consist in the deletion of the for statement. In the first snippet we used it to add the event listener on all the anchors, but in this updated version we are only adding one event listener. So, there is nothing to loop over.
The last change required needs a bit more thinking and discussion. In the first version of the code we were attaching the listener on the elements (the anchors) where the event of interest, the click event, is triggered. Therefore, every time the event occurs, all the operations defined in the event listener should be executed. In the improved version we’re developing, we’re adding a listener on an ancestor of the anchors and relying on event propagation. But because the chosen ancestor might be the ancestor of other elements we aren’t interested in, we have to prevent that events fired on these elements are ignored by our event listener.
In our pagination widget, if the click event is generated on a list item or on the ordered list itself, we don’t want to execute the event listener. So, we need a way to distinguish between the click events of interest and those to ignore. The widget we’re analyzing is pretty simple, so it’ll be enough to check the name of the element on which the event is fired. In particular, we need to check that the name of the element is A. To do that, we can check the nodeName property of the element referenced by event.target.
The updated version of our code that employs event delegation is reported below and also available on JSBin.
function onClick(event) {
   // If the event is not triggered on one of the anchors,
   // there is nothing we want to do
   if (event.target.nodeName !== 'A') {
      return;
   }

   // Prevent the default action
   event.preventDefault();

   // Store the link of the clicked anchor
   const url = event.target.href;

   // Update the results by sending an Ajax request
   // to the URL specified in the "url" variable

   // Update the anchors in the pagination widget

   console.log('Fetching results at ' + url);
}

const pagination = document.querySelector('.pagination');

pagination.addEventListener('click', onClick);
In the presented example, the choice of the ancestor to use was simple but this isn’t always the case. In the next section, I’ll discuss some rules of thumb for choosing the best ancestor element to use when employing event delegation.
What makes a good candidate for event delegation?
In the final version of our code, we have used the ordered list to attach the event listener used to fetch the new results, but its parent or one of its ancestors would have been possible candidates too. For example, we could have chosen the body or the html element as the ancestor to add the event listener.
Because the html element contains all the elements of the page, it’s always a possible candidate. Based on this consideration, you might think to always use it and avoid any additional thinking. But attaching many delegated listeners to the root or an element near the root of the DOM can degrade the performance of a web page. In such cases, every time the event of interest is fired on a descendant of the element, the event listener is executed. We could differentiate between the events as we’ve done in our example, but why executing the listener when it isn’t necessary?
A good practice is to attach the event listener to an element that is ancestor of all the elements of interest that is as close as possible to them in the DOM tree. This ensures the best performance while not having to add an event listener to each element we’re targeting.
Conclusions
In this article I’ve covered a technique called event delegation. The latter consists of adding an event listener to an ancestor of the element(s) on which the event of interest will be fired and takes advantage of the propagation of events in the DOM.
Event delegation allows a web developer to save memory when managing events and it’s especially convenient when working with web pages where elements are dynamically added and deleted. In your career you’ll find a lot of situations where event delegation is the right approach. So many, in fact, that you’ll ask yourself how you even worked without it.