When creating interactive web pages, developers often need to execute some actions when a given event occurs. Changing the image of a carousel when a user clicks on one of its arrows, showing a tooltip when a word is hovered, or validating a field when a user moves the focus onto another field are common examples. To execute these actions, we have to add event listeners to the elements of the page.
In this article, I’ll explain what event listeners are, and how to add and remove them from a web page. I’ll show several examples and talk about patterns to avoid when dealing with event listeners. The topic will be discussed in depth. So, even if you’re an expert, you might not know some of the details covered.
What is an event listener?
Before we delve into the discussion of adding and removing event listeners, let’s know more about them.
W3C definition
According to the W3C, an event listener is an object that implements the EventListener interface, which defines a single method named handleEvent(). An event listener is used to observe a specific event and perform one or more actions when it occurs. Event listeners are executed asynchronously via the event loop, in the same order they are added.
In older versions of Internet Explorer, the execution order wasn’t guaranteed to be the same as the order in which event listeners were added.
The handleEvent() method defines only one parameter which is the event object, implementing the Event interface, representing the event triggered such as click and focus. The method returns nothing (undefined, to be precise).
In conclusion, an object that possesses a handleEvent() method, like the one defined below, is a valid event listener.
const eventListener = {
handleEvent: function(event) {
// Do something here, possibly using the event parameter
}
};
If you have ever added an event listener to an element in the past, the previous object will look weird. It isn’t what almost every developer employs or is accustomed to. Most developers have never used an object when adding an event listener, but only a function. The W3C specifications explain this case:
Note: In JavaScript, user-defined functions are considered to implement the EventListener interface. Thus the event object will be provided as the first parameter to the user-defined function when it is invoked.
Functions used as event listeners can be named or anonymous, and defined before their usage or inline. Some examples are shown below:
// Named function
function foo() {}
// Anonymous function
function() {}
Because every function is a valid event listener, methods can be used as well. The snippet below defines a Utility object with a showTooltip() method:
const Utility = {
showTooltip: function(event) {
// Do something here, possibly using the event parameter
}
};
The difference between this example and the previous one where we saw an object is that we can only use the method as an event listener while in the other we can also use the object itself. So, the showTooltip() method can be used as an event listener, while the Utility object can’t. The reason is that the latter doesn’t possess a handleEvent() method. If this distinction is not clear yet, we’ll see some examples of use of a function and an object as event listeners in the remainder of the article.
WHATWG definition
The WHATWG DOM specifications provide a different definition of event listener. According to the WHATWG, an event listener consists of a type, a callback (which can be either null or that implements the EventListener interface), and other fields like capture, passive, once, and removed. As we’ll examine in the upcoming sections, the different definitions won’t have any impact on us as developers.
Now that we know what an event listener is, let’s see how to add one to an element of a web page.
Adding event listeners
With event listeners we can create interactive web pages by running animations, injecting new elements in the page, or performing any other action we wish when a given event occurs.
To add an event listener we have to employ the addEventListener() method. It allows the registration of an event listener on an event target (an object that implements the EventTarget interface). Most elements of a web page are event targets (for example comments are not). window and document are event targets as well. Other objects that are event targets include XMLHttpRequest, AudioNode, and AudioContext.
Different resources refer to the second parameter with different names. In addition to the terms event listener, listener, and function, you can find the use of callback (adopted by the WHATWG specifications) or handler (used by the addEventListener()‘s page on MDN).
Both the signatures define three parameters, the last of which is optional. The first parameter, type, is a string representing the event type to listen (such as click and focus). listener defines the object containing a handleEvent() method or function that we wish to use as the event listener. The last parameter differs in the two signatures. useCapture is a Boolean that indicates if we want the function to be executed during the capture phase (true) or the bubble phase (false). The default value for useCapture is false. The second signature has the options parameter which is an object that describes how the event listener will behave.
The third parameter hasn’t always been optional. That’s why in very old code you might see the value false passed instead of relying on the default value.
There are three properties that we can use at the moment for the options parameter, but the list is likely to grow in future:
capture: This option has the same meaning of useCapture, the last parameter of the first signature. The default value is false.
passive: A Boolean indicating if the listener will call the preventDefault() method (false) or not (true). If the value is set to true but the listener calls the method, the user agent will ignore the call to preventDefault() and generate a console warning. The default value for this property is false. Passive event listenersenable developers to opt-in to better scroll performance by eliminating the need for scrolling to block on touch and wheel event listeners. If you don’t need to call preventDefault() inside your function, I strongly encourage to set this value to true. The default value is false.
once: A Boolean specifying if the listener will only be invoked once after which it’ll be removed by the user agent. The default value is false.
Now that you know more about addEventListener(), let’s see an example.
An example of use of addEventListener()
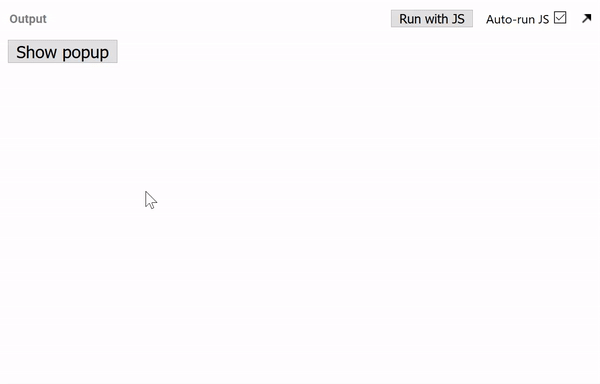
To see an event listener in action, imagine that we want to show a popup when a user clicks on a specific button. We also want the user to be able to close the popup by clicking a close button we’ll provide.
To start, let’s take a look at the HTML that can help us with this scenario:
In the snippet above, we’ve defined a button element having open-button as a class name. This button will be used to show the popup when clicked. We have also created a div element representing the popup. The latter features a title (h1), a paragraph (p), and a button (button) that can be employed by the user to close the popup itself.
With these elements in place, we are ready to define their behavior. The core of the short JavaScript code we need to write employs the addEventListener() method.
The snippet above relies on the first signature of addEventListener() but uses both a function and an object as the second argument. In the first call to addEventListener(), we pass a function as the second argument while the third is omitted (which is the same as passing false). So, the function will be executed during the bubble phase. In the second call, an object is employed as the second argument and the third is omitted.
Thanks to this example, you should have a better idea of how addEventListener() works. But there is much more to say about it. So, let’s dig a bit more into event listeners and some of their less-known features.
Event listeners with the same conditions are executed once
Something that not many people know about addEventListener() is that if we add the same event
multiple times, with the same conditions, it’ll be only executed once. To clarify this statement, let’s discuss an example.
Imagine that we have a showDialog() function and we want to listen for two event types, for example click and focus, on the same button. Under these circumstances, showDialog() will be executed twice because the conditions are different (we are listening for different event types). But if we use the showDialog() function for the same event type (for example click) on the same button, it’ll be executed only once.
In the example shown below, the eventListener() function will only be executed once because we’re calling it on the same element, with the same event type and phase.
function eventListener() {
// Do something...
}
const openButton = document.querySelector('.open-button');
openButton.addEventListener('click', eventListener);
openButton.addEventListener('click', eventListener);
The function would be executed twice if we had used it for the bubble phase the first time and the capture phase the second time.
Another case worth mentioning is when an object is passed as the third argument. Because objects are passed by reference in JavaScript, you might expect that we have to provide the exact same object for two event listeners to be considered with the same conditions. Luckily, this is not the case. Two event listeners will be considered with the same conditions if the objects we provide have the same properties and values.
As discussed in the previous section, the second argument passed to addEventListener() can be either a function or an object. So far, we’ve always discussed examples of object literals being passed but we can use an instance of a class too. And that’s because class instances are, in fact, normal objects. They are just created with a different syntax.
Take a look at the following snippet:
class Car {
constructor(brand) {
this.brand = brand;
}
handleEvent(event) {
console.log(event.type, this.brand);
}
}
const myCar = new Car('Ferrari');
The myCar variable, pointing to an instance of the Car class, is a valid event listener because it’s an object and has a handleEvent() method.
Inside the handleEvent() method we have a statement that prints on the console the event type, thanks to event, and the value of this.brand. If we pass myCar as the second argument to addEventListener(), when an event is triggered, the handleEvent() method will be executed. As a consequence, the event type and the string Ferrari will appear on the console. The reason is that this refers to the object pointed by the myCar variable, thus the value of the brand property is set to Ferrari.
If we pass a function to addEventListener(), the value of this is a reference to the event target. If we pass an object, the value of this is a reference to the object itself.
This discussion around the value of this inside an event listener might let you wonder what could be the benefits of using an object as a listener. This topic is covered in the next section.
Why using an object as an event listener?
One of the benefits of using an object is the possibility to store data. We can leverage this feature to store data that can help us managing the behavior of our web page. To better understand this concept, let’s discuss a simple example.
JavaScript allows to add properties to functions too. This is possible because functions are executable objects. That is, in JavaScript, every function is actually an object with the additional feature of being executable. In the majority of the cases, objects remain the correct data structure to store data though.
Our goal is to show a button that performs a given action only after another button has been clicked twice. Because the second button could not be completely ignored by the user, we don’t want to add the event listener for the first button unless it’s necessary. Moreover, to achieve our goal we need to keep track of the amount of time the second button is clicked.
The following code is a possible solution for this case:
Before moving to the next section, let’s discuss another interesting case. It shows how we can keep our code more organized by using an object as an event listener.
By employing some naming conventions for the methods name of an object, we can create a class that has a handleEvent() method which delegates to other methods the action to perform when a given event occurs. In essence, we have the same entry point for different event types but then we use such entry point to delegate the actual action(s) to perform to other methods of the same object.
A possible implementation is listed below:
class Listener {
constructor(element) {
this.element = element;
}
onBlur(event) {
// Do something when the blur event occurs
console.log('onBlur');
}
onClick(event) {
// Do something when the click event occurs
console.log('onClick');
}
onFocus(event) {
// Do something when the focus event occurs
console.log('onFocus');
}
handleEvent(event) {
const methodName = 'on' + event.type.replace(/^./, function(matches) {
return matches[0].toUpperCase();
});
this[methodName](event);
}
}
In this snippet, we create a class that has a constructor to which we can pass a DOM element. Such DOM element is stored into a property named element. We’ll use it to store the event target. The class also features a handleEvent() method, so an instance of such class can be used as an event listener. In addition, we’ve defined other three methods: onBlur(), onClick(), and onFocus(). We want to invoke these methods when the relevant event occurs. For example, we want to execute onClick() when the click event occurs.
The most interesting part of the previous snippet is the body of the handleEvent() method. It invokes all the other methods by taking advantage of the event type. Inside handleEvent() we turn the first letter of the type property of the Event object passed to the function into uppercase. The result of this operation is concatenated to the string “on” and assigned to the methodName variable. Therefore, assuming that the click event was triggered, the value of methodName will be the string "onClick". This explains how handleEvent() invokes the relevant method among those available.
The approach described is not new and has been discussed by other developers.
So far, we’ve discussed a lot about the second argument of addEventListener(), but not a lot about the third one. Let’s dig into it.
Detecting support for the options parameter
The possibility to pass an object of options as the third argument to addEventListener() has been introduced with the W3C DOM Level 4 specifications. This means that the first signature of addEventListener() has been around long before the second. Therefore, not all browsers we might want to support implement it and we should employ feature detection to establish if the browsers in use by our users support this feature.
By adopting feature detection, we can make our code backward compatible. As you might know, in JavaScript an object is a truthy value. If the browser on which the code is running doesn’t support an object of options as the third argument, it’ll interpret the object as true. As a result, the event listener will be executed during the capture phase which might not be what we want. Another reason to use feature detection is that, except for capture, the properties available have been added at different times. So, we also have to check if the specific properties we want to use are supported.
To test all the options available to date, we can employ the following getOptionsAvailable() function. It returns an object containing the options defined by the specifications as its properties and a Boolean specifying if the option is supported as its values. The value of a property will be true if the option is supported; false otherwise.
In addition to testing the options available, we should also test if passing an object as the third argument is supported at all. To achieve this goal, we can use the following isOptionsSupported() function which relays on the previously defined getOptionsAvailable():
function isOptionsSupported() {
return !!getOptionsAvailable().capture;
}
The examples discussed up to this point demonstrated how to add event listeners to the elements of a page. However, there are situations where we need to remove an event listener that we had previously added. In the next section we’ll examine how to achieve this goal.
Removing event listeners
Once an event listener is added, it typically remains in effect for the remainder of the page’s life. There are cases where an event listener is not needed anymore and we want to remove it. Consider, for example, a page where multiple steps are presented to the user and once a step has been completed, its controls revert to read-only. If we remove the associated event listeners, not only we avoid to run useless operations but also save memory.
To remove event listeners which we previously added we can employ the removeEventListener() method. Like addEventListener(), the removeEventListener() method has two signatures:
The meaning of the parameters is the same as addEventListener(), so I won’t repeat their description.
Removing an event listener is a bit more complex than you might expect. The first thing to know is that there is no such method like removeEventListeners() or removeAllEventListeners() that removes all event listeners from an event target. You need to remove the event listeners added to an event target one at a time. Moreover, in order to remove an event listener you need to keep a reference to it. This means that at the time you call removeEventListener(), you need to have something that points to the event listener, for example a variable. To better understand this concept, let’s see some examples.
Examples of use of removeEventListener()
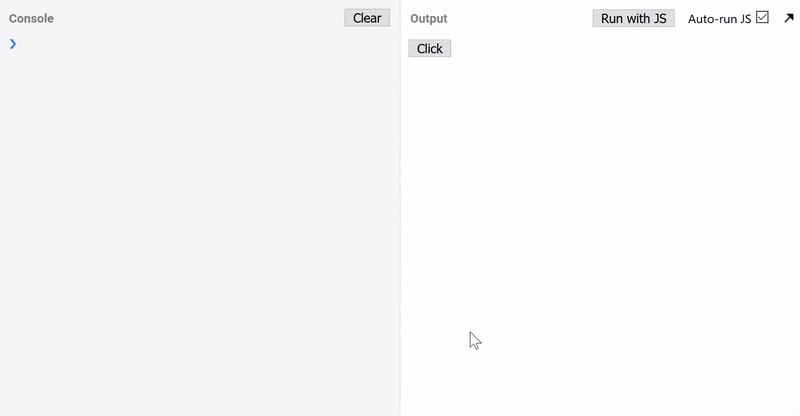
To start, we’ll take a look at a simple example. We’ll add an event listener on a button which will remove itself once executed. In essence, this is the same as setting the once property of the options parameter to true.
The previous example demonstrates the use of a function as the event listener. Let’s now see a case where we might want to add and then remove an object as an event listener.
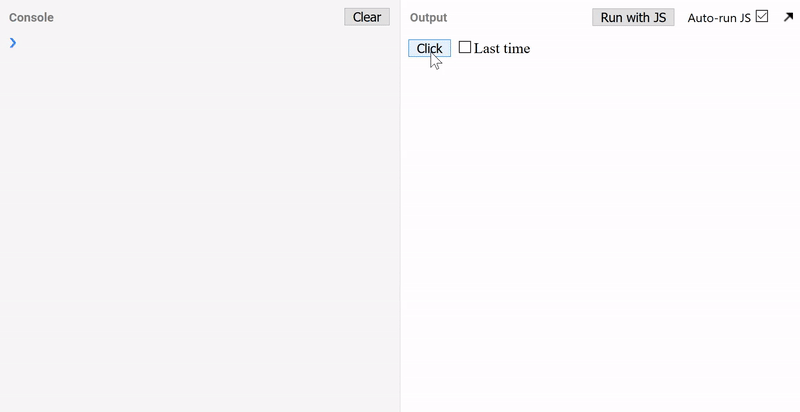
Imagine that we have a button which has an event listener added to it. The latter listens for the click event and it must be removed after a given user action, for example the user has checked a checkbox. So, we need to keep track of this state. By creating an object with a isLastExecution property and a handleEvent() method, we can solve this problem.
This example shows how we can add and remove event listeners of several types, functions and objects, from a button based on the checked state of a checkbox.
We start the code with the definition of two functions and an object literal (myObject). In particular, the code shows a function declaration (eventListener()) and a function expression (listener()). All of them will be used as event listeners for the button. As mentioned, there is no way to add or remove more than one event listener at a time. So, we create two support functions, customAddListeners() and customRemoveListeners(), to achieve this goal.
Then, we look up for the button in the page and enable the event listeners by calling customAddListeners(). Finally, we look up for the checkbox and add an event listener to it that listens for the change event. When this event occurs, we enable or disable the event listeners for the button based on the state of the checkbox.
The most observant of you might have noticed that I used an anonymous, inline function as the event listener for the checkbox. In most of the examples shown in this article, I’ve avoided using one for reasons that will be clarified in the next section.
Dangerous patterns
In this section we’ll cover some patterns that should be used sparingly because they have drawbacks.
Let’s start our discussion with anonymous, inline functions. They can be used as event listeners but you should almost always avoid them because, once added, they can’t be removed. The reason is that we don’t have any reference pointing to them that we can pass to removeEventListener(). So, only use anonymous, inline functions when you’re absolutely sure that the event listener has to be kept until a user leaves the page.
To help you visualize this situation, take a look at the following snippet:
const button = document.querySelector('.button');
button.addEventListener('click', function() { /* Some logic here */ });
button.removeEventListener('click', ?????);
You might wonder why we care so much about removing event listeners. On one hand it’s because event listeners are stored in the browser’s memory and the memory is limited. So, if we never clean it up by removing event listeners that are not relevant anymore, we end up in a situation where the page takes up all the memory it can until the browser tab crashes. On the other hand, event listeners consume CPU time because they are executed every time the relevant event occurs. And if we haven’t removed event listeners that are not necessary anymore, we’re just wasting CPU time and slowing down our web page.
The example above is not the only dangerous pattern. In the same way we can use an anonymous function to addEventListener(), we can pass an object literal that is not assigned to a variable first. Therefore, we don’t have a reference to it which means we can remove the event listener.
Consider the following example:
const button = document.querySelector('.button');
button.addEventListener('click', {
handleEvent: function() { /* Some logic here */ }
});
button.removeEventListener('click', ?????);
The last cases I want to mention are the use of an inline, arrow function and the use of bind(). If we don’t store them somewhere (like a variable), we won’t have a way to remove the event listener. Examples of these patterns are shown below:
function listener() { /* Some logic here */ }
const button = document.querySelector('.button');
const anotherElement = document.querySelector('.element');
button.addEventListener('click', () => { /* Some logic here */ });
button.addEventListener('click', listener.bind(anotherElement);
button.removeEventListener('click', ?????);
The list of cases described in this section is non-exhaustive, but all the others are a combination or very similar to the ones presented. So, you should have all the knowledge required to spot a bad pattern and avoid it.
Conclusions
In this in-depth tutorial I have introduced you to the definitions given by the W3C and the WHATWG for an event listener and an event target. The specifications revealed us that an object featuring a handleEvent() method can be used as an event listener too, something that not many developers know.
Then, we examined addEventListener() which allows to add an event listener on an event target. While discussing this method, we’ve seen the parameters defined in its signature and the different values we can pass. We’ve also analyzed how to detect the support for the new options parameter, introduced in the DOM level 4 specifications. Moreover, we have discovered that different browsers support different properties of this new parameter. So, we have discussed a function that allows us to detect which properties are supported.
Finally, I’ve described the two signatures of the removeEventListener() method, which we can use to remove event listeners, and some of the patterns we should avoid.
This website uses cookies to improve your experience. We'll assume you're ok with this, but you can opt-out if you wish.AcceptRead More
Privacy & Cookies Policy
Privacy Overview
This website uses cookies to improve your experience while you navigate through the website. Out of these, the cookies that are categorized as necessary are stored on your browser as they are essential for the working of basic functionalities of the website. We also use third-party cookies that help us analyze and understand how you use this website. These cookies will be stored in your browser only with your consent. You also have the option to opt-out of these cookies. But opting out of some of these cookies may affect your browsing experience.
Necessary cookies are absolutely essential for the website to function properly. This category only includes cookies that ensures basic functionalities and security features of the website. These cookies do not store any personal information.
Any cookies that may not be particularly necessary for the website to function and is used specifically to collect user personal data via analytics, ads, other embedded contents are termed as non-necessary cookies. It is mandatory to procure user consent prior to running these cookies on your website.